If you are interested in having a flyer, poster, cd cover, business card, website or some other creative service please inquire. It is only a 5 step process from start to finish. If you would like to know the price range for a specific service then shoot an email to Creative Graphic Art at [email protected] I will send you a general price range for project.
1.) Briefing: To get the process started fill out the creative brief. The brief will give me background information concerning you, your business and the services you desire.
2.) Proposal: Based on the creative brief you supply and our pricing guide, a service agreement will be provided to you by email. Once the terms are agreed to then we go to the next step.
3.) Design: The work begins. The project will determine the length of time
before receiving the first draft.
4.) Approval: The drafts will be presented for you to approve or reject. If concept is rejected, feed back is required for revisions. Steps 3 and 4 are repeated until design is approved. Once approved then we proceed to step 5.
5.) Deliver Goods: Based on the agreement you will be provided your deliverables.
If you would like a logo, flyer, or website designed please contact us.
0 Comments
Building a brand is not a one time attempt. A brand is built over time in the mind of the consumers. Creating a logo, brochure, business card, flyer, or website is not the complete outline of your business. The building in which your business resides is not the complete impression but having a controlled consistent approach in bringing them all together over time creates a more complete picture and credibility of your business in the consumers mind.
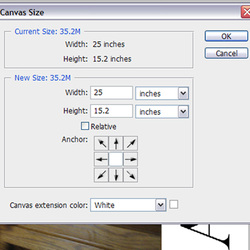
To resize your canvas in photoshop you want to go to IMAGE –>CANVAS.
There are two ways to change the canvas size.
1.) Absolute
2.) Relative
In absolute method you put the entire size of the image. If you start with a 4in by 6 in canvas and want a 8in by 10 in canvas then you would put 8in by 10in which would result in an increase in the canvas size. The background color will appear.
In the relative method you would check the box name relative. Then you would only enter how much you want the canvas to increase by. Therefore if you have a 4 by 6 image again and you want to increase the borders by .5 inches then you would say1 in for the width and 1 in for the height.
You can also just add canvas to one side by changing the anchor.
Changing the canvas size adapts to increasing as well as decreasing. Check out the video below.
Here are some short cuts to help you navigate photoshop.
Control + = to zoom into the picture
Control - = to zoom out of the picture
Z = give you the magnify glass to zoom in or out
Holding space bar = gives you the hand to pan to left ,right, up, or down around the page.
Plus other short cuts for navigating Photoshop.
Here is a quick video tutorial on how to navigate Photoshop for all you newbies out there. Hopefully this is helpful. You can instantly download the Photoshop video course by going to the store. http://www.creativelogoart.com/store2ps.html
 RSS Feed
